ImageJ Macros - Scripted Image Processing
Introduction
These notes are intended as an introduction to effective use of ImageJ, a mature image-processing platform created by the National Institute of Health (NIH).
There are many excellent ImageJ tutorials and resources available online. Notable examples include:
- The official ImageJ site tutorials and examples: http://rsbweb.nih.gov/ij/docs/index.html
- EMBL/CMCI ImageJ resources (inc. textbook): http://cmci.embl.de/documents/ijcourses
- CNRS MRI ImageJ workshop: http://dev.mri.cnrs.fr/wiki/imagej-workshop
- Goettingen Astrophysics ImageJ tutorial/book: http://www.astro.physik.uni-goettingen.de/~hessman/ImageJ/Book/
Whilst having been initiated for the medical and biological sciences, ImageJ, because of it’s extensible nature and large variety of plugins is now used in many disciplines requiring image processing.
Prerequisites
Required
You should already be familiar with the ImageJ User Interface, including
- How to open an image file
- How to manipulate the image using the toolbar
Desired
In addition, you should ideally
- Have some knowledge of how to record a macro using the ImageJ toolbar
- Understand basic programming concepts, such as
- what a variable is
- the difference between a variable, and eg a string (aka string literal), an integer
Advanced
If you also know about
- what a function is
- control flow contructs such as
- if … else
- for loop
- a scripting language such as Javascript or Python
then this course should be a breeze, and simply a case of learning and practicing how to use the ImageJ specific functions to create useful image processing pipelines.
Projected Progress
The attendees of this course will losely fall into three categories outlined in the previous section, namely those with the
- minimal required background knowledge
- minimal and desired background knowlege
- minimal, desired, and advanced background knowledge
Accordingly, at the end of these sessions you can expect to
-
- Know how to record a macro to create a reproducible workflow
- Be able to make small changes to the recorded macro
-
- Also be able to make moderate changes to the recorded macro
- Write your own simple macros from scratch
-
- Write rich and complex macros from scratch
Working on your own data
A core component of this workshop is the idea that you would be able to practice what you’ve learned with help at hand.
During each session, after you have completed the exercises scheduled for that session you are invited to work on your own data on tasks relevant to your research. We will be at hand to help you out when you get stuck!
Printing the notes
For both environmental reasons and to ensure that you have the most up-to-date version, we recommend that you work from the online version of these notes.
A printable, single page version of these notes is available here.
Errata
Please email any typos, mistakes, broken links or other suggestions to j.metz@exeter.ac.uk.
Installing
If you want to use imagej on your own computer I would recomend using Fiji which can be downloaded from
Fiji is ImageJ with additional functionality and bundled plugins.
Alternatively standard ImageJ can be downloaded from
http://imagej.nih.gov/ij/download.html
Recording
Recap : Basic functionality
Starting FIJI
To start FIJI on the computing room computers, click on the Fiji folder
on the Desktop, then select Fiji.app and click on ImageJ-win64.exe.
The core functionality in ImageJ is accessible via the menu bar shown below.
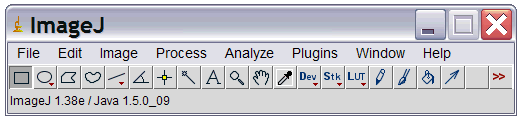
In the rest of this text, the notation
File > Open
indicates selecting first the “File” menu and then the “Open” Sub-menu/command.
Loading data
File > Open or File > Import (depending on data type).
Open is generally used for 2D data sets (images) and Import for 3D data sets, as it allows opening image sequences, multi-layer tiffs, and films (avis).
Introduction to macros
Imagej has a macro system to allow the user to rapidly repeat a set of commands without having to execute each one individually.
For example, you may want to automate counting “blob”-like objects in images, which requires that you blur the image, then find maxima, and finally count the number of peaks.
Instead of running all three operations on each input image, the easiest way to create a macro is to let imagej record it when you perform the sequence of actions once.
Recording macros
First open an image that you will process. This operation will not be included in the macro at this point.
Next press Plugins > Macros... > Record ... to open up the macro
recording dialog (“Recorder”).
The recording has begun; any subsequent operations will appear in the Recorder dialog.
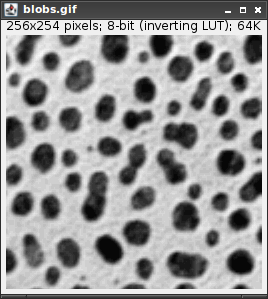
As an example after having opened Blobs from the samples (Hint: Use Ctrl+Shift+B), start the recorder.
Slightly broken ImageJ: use this link!
Next perform the following operations:
Image > Duplicate ...- Set the title to “Blurred”
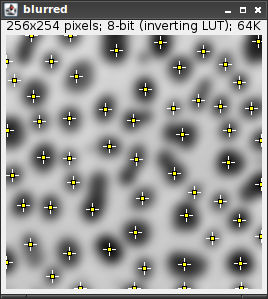
Process > Filters > Gaussian Blur...- Enter sigma = 5
- Press OK
Process > Find Maxima...- Check “Light Background”
- Press OK
Analyze > Measure
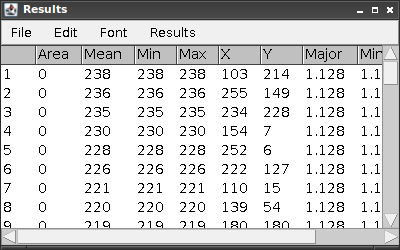
The Results window will show various measurements for the detected peaks (there should be 59!).
The Recorder window should show
run("Duplicate...", "title=blurred");

run("Gaussian Blur...", "sigma=5");

run("Find Maxima...", "noise=10 output=[Point Selection] light");

run("Measure");


which summarizes the operations we performed.
This macro can be saved using the Create button to save the macro with the name specified in the “Name” field. This will open a save file dialog. Confirm that the filename is one that makes sense to you and a usual location is the imagej/Macros folder, then go ahead and save the Macro.
The macro can be applied on any loaded image by calling
Plugins > Macro > Run...
and finding and selecting the macro we just saved.
Exercise 0.0 (Recap)
Use the above approach to apply the gaussian filter to the blobs data set over a short range of blur radii. At each scale, find the peak locations.
Exercise 0.0
Exercise 0.0 - Recap recording macros
- Load the blobs image
File > Open Samples > Blobs
- Record a macro to perform gaussian filtering on one scale;
Plugins > Macros > Record...Process > Filters > Gaussian Blur ...- Set sigma = 1
- Press
Ok
Process > Find Maxima- Select
Light background - Press
Ok
- Select
Analyze > Measure
Now either copy and paste the code recorded in the macro window multiple times to end up with, e.g.
run("Gaussian Blur...", "sigma=1");
run("Find Maxima...", "noise=10 output=[Point Selection] light");
run("Measure");
run("Gaussian Blur...", "sigma=2");
run("Find Maxima...", "noise=10 output=[Point Selection] light");
run("Measure");
run("Gaussian Blur...", "sigma=3");
run("Find Maxima...", "noise=10 output=[Point Selection] light");
run("Measure");
run("Gaussian Blur...", "sigma=4");
run("Find Maxima...", "noise=10 output=[Point Selection] light");
run("Measure");
Extension
If you’re happy with trying Macro scripting, you can try
the for loop syntax:
for(scale=1; scale <= 4; scale = scale + 1){
    run("Gaussian Blur...", "sigma="+scale);
    run("Find Maxima...", "noise=10 output=[Point Selection] light");
    run("Measure");
}
Programming macros
Basic Programming Concepts
The ImageJ Macro (IJM) language allows for a range of programming features. To be able write Macros we need to understand some basic prohgramming concepts.
Variables and Data types
A variable is a way of storing information in a program. This information is usually in the form of a specific type of data. In the ImageJ Macro language, the basic data types are
- Strings : a string a characters, like words or sentences. Strings are enclosed in quotes or double quotes.
- Numbers : a decimal or integer number
Unlike statically typed programming languages like Java or C++, you don’t need to explicitly declare what type your data is in IJM; the interpreter will dynamically determine the datatype.
For example if you write
a = 10
the interpreter will know that a holds a numerical data type.
Similarly (and even in the same piece of code) you may later write
a = "a string"
and then a will be a variable that holds the string “a string”.
Basic operations
We can perform basic operations on numerical and string data types.
For numbers we can perform the usual mathematical opertaions such as addition, subtraction, multiplication, division, and IJM also includes a host of additional numerical functions.
Strings can be concatenated ("a " + "b" gives “a b”)
Keeping track of your program with the print function
The IJM print function will output the contents of the arguments you pass to the function to the log window.
Developers often use such logging functions to keep track of program-related information that end-users don’t necessarily need
to see.
For example if we write a macro
a = 1
print(a)
a = a + 1
print(a)
a = "Now I'm a string"
print(a)
we will see how a variable can be dynamically typed (and the type of that variable changing).
Exercise 1.1
Create a new macro, and create a variable that holds the string “The answer is “ and a second and third variable that hold the numbers 420 and 10. Using these three variables, get the macro to print “The answer is 42” to the log window.
Exercise 1.1
Exercise 1.1
The main things you need to do this are:
- The
printfunction, e.g.print("Hello") - Creating a variable, e.g.
a = 10 - Play around with the data type operations - see http://rsb.info.nih.gov/ij/developer/macro/macros.html#operators
Controlling program flow
The most basic programs are a sequence of commands we wish the computer to perform, much like a set of menu instructions or the guide to construct a piece of flat-pack furniture.
However, programming languages also allow for the flow of the program to be controlled. We’ll look at two of the basic control flow contructs below.
The if statement
The if statement allows us to to only execute code under certain conditions (and if we use the else block, then to
execute a separate piece of code under the alternative condition.
The syntax for the if statement is
if( CONDITION THAT IS TRUE OR FALSE )
{
    CODE TO EXECUTE IF TRUE;
}else{
    CODE TO EXECUTE IF FALSE;
}
A trivial example might be
if( a > 10 ){
    print("The number was more than ten");
}else{
    print("The number was less than or equal to ten");
}
Note In the case of
if-elseblocks, you need to use semi-colons to mark the end of each statement as show. ImageJ isn’t strict about semi-colons elsewhere.
for loops
Often we want to repeat a block of code many times, for example to with only small changes between the iterations.
A common example is when we want to perform a batch operation, i.e. to repeat a set of commands on each file in a directory.
In such a scenario, we change just the file name over each iteration of the loop.
The for loop syntax is
for( INITIAL ; CONDITION ; UPDATE ){
    CODE TO EXECUTE FOR EACH ITERATION
}
The INITIAL statement is often used to set a loop variable which is a variable that keeps track of the number of times a loop has been run.
For example the INITIAL statement might be i = 0, meaning that we are going to
use i as the loop variable name and start it at zero.
The CONDITION is a statement that evaluates to true or false; the loop will
continue until the CONDITION evaluates to false. For example, if we want to
run a for loop 10 times, we might use ` i < 10 , which is **true** while i` is less than 10.
Lastly comes the UPDATE statement, which is often used to update the loop variable. Continuing
our example, we might use i++ which is used in IJM (and some other languuages) to increement
i, i.e. as an abbreviation of i = i + 1.
A complete simple example then would be
print("Counting up to 10")
for( i = 0; i < 10; i++){
    print("i = " + i);
}
Exercise 1.2
Create a new macro, and create a for loop over the numbers 1 to 100. Get the macro to print the word “ODD” for every odd number and “EVEN” for every even number.
Exercise 1.2
Exercise 1.2
The most straight forward way to achieve this is to place an if statement inside a for loop; set the loop variable to start at 1 and end on 100, and then for each value, check if the number is odd.
Hint to see if a number is odd, try the remainder operator (%).
Functions
The last thing that we’re going to cover before getting started with writing
ImageJ macros, is the idea of definining functions.
The print function that we encountered above is a simple example of a function that
writes it’s inputs (arguments) to the log window.
As well as using pre-defined functions, we can define our own functions, using the
function statement. For example, if we want to create a function that takes two
inputs and creates a string containing their values we could write
function combine_strings( a, b ){
    new_string = "Variable 1 is [" + a + "] and variable 2 is [" + b + "]"
    return new_string
}
Exercise 1.3
Create a new macro and then define a function called odd_even_sorter
that takes as an input a lower and upper limit. It then performs the
same “sorting” as you performed in Exercise 1.2, but now for arbitrary
ranges.
Test it on the ranges 1-3, 10-20, and see what happens with 100-90 (is this what you would expect?).
Exercise 1.3
Exercise 1.3
You’ll need to define a function using function and use the code from the ODD / EVEN sorter you encountered in the for loop section.
E.g.
function sorter(lower_limit, upper_limit){
    // Code from the sorter section, replacing the hard coded initialization with lower_limit
    // and the upper limit in the condition with upper_limit
    for(i=lower_limit; i< upper_limit; i++){
        // the odd even bit, on `i`
    }
}

// Testing
sorter(1, 10);
sorter(40,50);
The ImageJ Macro language makes use of the above programming constructs, as as well a wide range of predefined functions which can be found at http://rsb.info.nih.gov/ij/developer/macro/functions.html
Editing Macros
Writing macros
Recording macros is useful for starting to understand the imagej macro system, and for very simple tasks.
Much more flexibility and control is afforded by learning to edit and write macros. As an example, load the Macro we created in the last subsection,
Plugins > Macros... > Edit...
and select the file that was saved.
This opens an imagej editor window (the title will be the macro file name, usual extension, .ijm).
You should see the commands run("Duplicate...", "title=blurred"); etc
that you recorded in the previous section.
Now lets edit the file, making a simple substitution. Instead of calling the Gaussian Blur with a hardcoded number for sigma, lets use a variable.
Replace
"sigma=5"
with
"sigma="+value
First of all, let’s examine what the original line did. Without
digressing too much, the ImageJ Macro function run takes a variable number of
arguments, separated by commas ( , ). The second line passed two string
(anything between two double quotes ( “ )) arguments to run. The first
argument was the name of the function, “Gaussian Blur…”, and the
second the parameters to that function in string form, “sigma=5”.
Our replacement line means the following; instead of using the hardcoded string “sigma=5”, create a string by appending the variable value to the string “sigma=”
This means we are free to specify the number assigned to value elsewhere.
Run this macro on an open image - save the file (File > Save) and run
the macro (Macros > Run).
You should end up with an error dialog entitled “Macro Error”.
Read through the contents of the window. The error message is letting you know that while trying to run the macro, the parser came across a variable, called value, which had not been defined.
Congratulations!
You have completed your first ImageJ debugging operation -proficiency at debugging skills is at the heart of good scripting/programming
Go ahead and define value. This can occur anywhere above where it is first used. In our case that means inserting a new first line.
tip
Good coding
It is useful to define “constant” variables at the start of your code so that you can quickly locate them if you need to check or change them
To define value in the imagej macro language we can simply write, for example,
value=5;
in a new first line.
If you run the macro now, you should find it performs exactly the same task as before.
note
ImageJ Macro scripting uses dynamic typing. This means that the type of a variable, meaning whether it’s an integer number, a character, etc, is inferred from the assignment statement. While allowing less coding (you don’t have to declare variable types), there is increased risk of adding bugs which may be difficult to track down, so do pay extra attention!
We haven’t gained anything yet, as we’re back where we started after recording the macro.
So let’s make use of a simple control flow construct, the for loop.
The for loop is a way of iterating over values and performing operations using those values.
The syntax is
for ( <initial statement > ; <condition to test before each iteration>
; <statement to perform after each iteration>){

    <code to perform each iteration>

}
NB: Everything in brackets ( < > ) should be replaced.
For example if we modify our original code to the following:
for (value=2; value<=10; value+=2){

    run("Duplicate...", "title=blurred");

    run("Gaussian Blur...", "sigma="+value);

}
we will have created a for loop that initializes value to 2, checks at each iteration that value is less than or equal to 10, and increments value by 2 at the end of each iteration.
Then for each iteration the statements enclosed within the braces are performed.
If you run this you will end up with multiple windows, with increasing amounts of blurring.
There many more programming constructs that can be used, such as while loops, do while loops, if/else conditions, and many more. For more information see http://rsbweb.nih.gov/ij/developer/macro/macros.html.
Batch processing 2
The batch processing we learned how to access via the user interface can also be achieved by delving into the macro code.
Again, more control is available to those willing to code this functionality in the form of a loop.
For example, if we have a folder whose path is stored in the DIRECTORY variable, with images titled image001.tif, image002.tif, … etc, then the following would load each in series.
DIRECTORY = "C:\Some\Path\That\Has\Loads\Of\Data\";
allfiles = getFileList(DIRECTORY);
NUMFILES = allfiles.length;
value = 2;

for (filenumber=0; filenumber<NUMFILES; filenumber++){

open(allfiles[filenumber]);

run("Duplicate...", "title=blurred");

run("Gaussian Blur...", "sigma="+value);

}
Here we used a built-in imagej function, getFileList. As the name suggests, it scans a directory and returns a list (technically, an Array) of file names. We also made use of the fact that Java arrays have an attribute, length, which tells us how many elements the array contains.
Now we could also add more functionality that saves output from the processing, and uses the input filename in the output filename.
note
Unlike common everyday enumeration, array elements are accessed using zero-indexing in Java (and the ImageJ macro language) in the same way that we start at ground 0 when counting floors of a building! This means that to access the first element of an array called “A” we would use
A[0]
Exercise 2.6
Exercise 2.6
Exercise 2.6
Edit the macro you recorded that performs blurring to include a a for loop that blurs using sigmas 1.5, 2, 2.5, 3, … up to 10.
At each iteration, find all peaks and try and store the locations of these peaks.
Use the getFileList function to perform this operation on all of the files in your stacks folder, i.e. do not use the batch user interface!
See the bottom of the Help section for Exercise 2.4 to get started with the for loop…
Note The following section requires a fair amount of knowledge programming knowledge (either in Java or similar). If you have reached this section, and do not wish or are unable to proceed with plugin writting in Java, please see a demonstrator about working on an advanced macro project.
Extra: Advanced Macro Projects
If you have reached this far, you should be able to write a macro from scratch.
Please see a demonstrator about coming up with a macro that does something that’s useful to you!
Extra: Introduction to Plugin writing with Java
ImageJ is written in Java, which is a general purpose programming language designed to allow developers to write code once and run on any machine, as java programs are executed via the Java virtual machine.
ImageJ offers the ability go beyond the limitations of the macro language via writing your own plugins in Java. We will cover the basics of writing a plugin by giving the template of a simple plugin.
tip
As with Macro writing, an easy way to learn is by first modifying an existing plugin that has functionality that overlaps with what you want to do!
Lets start with a simple plugin to invert an image (from [http:g/rsbweb.nih.gov/ij/plugins/download/Image\_Inverter.java](http:g/rsbweb.nih.gov/ij/plugins/download/Image_Inverter.java) )
import ij.*;
import ij.plugin.filter.PlugInFilter;
import ij.process.*;
import java.awt.*;

/* This sample ImageJ plugin filter inverts images.

A few things to note:
 1) Filter plugins must implement the PlugInFilter interface.
 2) User plugins do not use the package statement;
 3) Plugins residing in the "plugins" folder, and with at
 least one underscore in their name, are automatically
 installed in the PlugIns menu.
 4) Plugins can be installed in other menus by
 packaging them as JAR files.
 5) The class name ("Image_Inverter") and file name
 ("Image_Inverter.java") must be the same.
 6) This filter works with selections, including non-rectangular
selections.
 7) It will be called repeatedly to process all the slices in a stack.
 8) It supports Undo for single images.
 9) "~" is the bitwise complement operator.
*/

public class Image_Inverter implements PlugInFilter {

 public int setup(String arg, ImagePlus imp) {
 if (IJ.versionLessThan("1.37j"))
 return DONE;
 else
 return DOES_ALL+DOES_STACKS+SUPPORTS_MASKING;
 }

 public void run(ImageProcessor ip) {
 Rectangle r = ip.getRoi();
 for (int y=r.y; y<(r.y+r.height); y++)
 for (int x=r.x; x<(r.x+r.width); x++)
 ip.set(x, y, ~ip.get(x,y));
 }

}
Exercise 3.1
Modify the plugin above to return a log-scaled version of an image.
tip
The following page may help:
http://docs.oracle.com/javase/6/docs/api/java/lang/Math.html
Exercise 3.1
Exercise 3.1
This is a very straihghtforward assignment - this requires 3 things (in a single line):
- replace
~(...)withMath.log((...)) - convert the output of
Math.logto afloatusing...(float)Math.log... - Use
setfinstead ofset
NB: This will produce strange results if used with an 8-bit image
Exercise 3.2
Create a plugin to perform maximum filtering over a 3x3 region; that is replace each pixel with the maximal value in a 3x3 neighborhood.
Exercise 3.2
Exercise 3.2
For each pixel location (x,y) you will need to examine the neighboring pixel values.
Don’t forget to handle boundaries! For non-boundary pixels you will need to check 8 pixels for each location (x,y), whereas for edges (corners), this reduces to 5 (3)!
Lastly you will need the Math.max function.
Exercise 3.3 - Advanced
Modify the macro from exercise 2.2 with a plugin that displays a dialog box to allow users to enter values for minimum and maximum scales, and show a live preview of peaks found.
Exercise 3.3
Exercise 3.3
** Note: ** This is a difficult problem and requires that you familiarize yourself with the imagej plugin API (Advanced Programming Interface).
Shameless plug: Using Python with numpy and scipy instead of ImageJ
Java is a relatively low-level language, meaning that more code is required to achieve any given task.
The following table summarizes this in terms of Statements and Lines ratios, which shows the the number of statements/lines of c that each statement/line of the compared language is equivalent to.
| Language | Statements ratio | Lines ratio |
|---|---|---|
| C | 1 | 1 |
| C++ | 2.5 | 1 |
| Fortran | 2 | 0.8 |
| Java | 2.5 | 1.5 |
| Perl | 6 | 6 |
| Smalltalk | 6 | 6.25 |
| Python | 6 | 6.5 |
More expressive languages exist, but are relatively new and less mature than those listed here.
As a very simple example, the java code to iterate over elements of a 2D array A and write the value to the console is
for (int i=0; i<size0; i++){
    for (int j=0; j<size1; j++){
        System.out.println(A[i][j]);
    }
}
while the equivalent Python syntax is
for a in A.ravel():
    print a
The difference doesn’t seem a lot, but as a program grows, a factor of 2 or 3 in the amount of code writen starts to become important.
In addition, development time is generally much longer than the time taken to use the produced algorithm/software, thus making easier development more important than speed of final program.
Because of this I encourage those of you interested in advanced image processing and related tasks to also consider using Python (or a similarly powerful and expressive scripting language, e.g. Matlab) as your image processing platform.
While ImageJ is a great platform for simpler to intermediate image processing tasks, problems can arise due to the overhead of programming in Java when wanting to extend beyond the macros and existing plugins as mentioned in the previous section.
Equivalent to the Inverter plugin
import numpy
import scipy.misc

data = scipy.misc.imread(filename)
# NB: the data can be 3d etc.
data = ~data
note
The simple example above neglects ROI handling. This can be achieved in numpy using masked arrays. E.g.
data = numpy.ma.masked_where(data < 10, data)
Subsequent operations are performed on the elements of the array where the condition is met.
Python offers an alternative scripting environment with a high-level access to a larger range of functionality including
- Better numerical and matrix operations via the
numpymodule - More sophisticated and publication quality graphs and figures via
e.g. the
matplotliblibrary - Interface to native (i.e. fast!) computer vision libraries such as
OpenCV,Scipy.ndimage - Fast OpenGL based visualization using a high level interface via
bindings to the
vtklibrary
Just as you have been given an introduction to Macro writing in this course, the first step is to learn the basics of the Python programming language.
Check the Bioinformatics Hub events page for details of upcoming couses
The Software Carpentry website also contains good tutorials and other material for learning more about Python and good programming practices http://software-carpentry.org/4_0/python/
Footnotes
1
Scale-space analysis has rigorous mathematical foundations, see the numerous works by Tony Lindeberg, for example http://www.csc.kth.se/~tony/abstracts/Lin94-SI-abstract.html
2
This is known as the Difference of Gaussians (DoG) filter, and is regarded as an efficient approximation to the Laplace of Gaussian (LoG) filter